
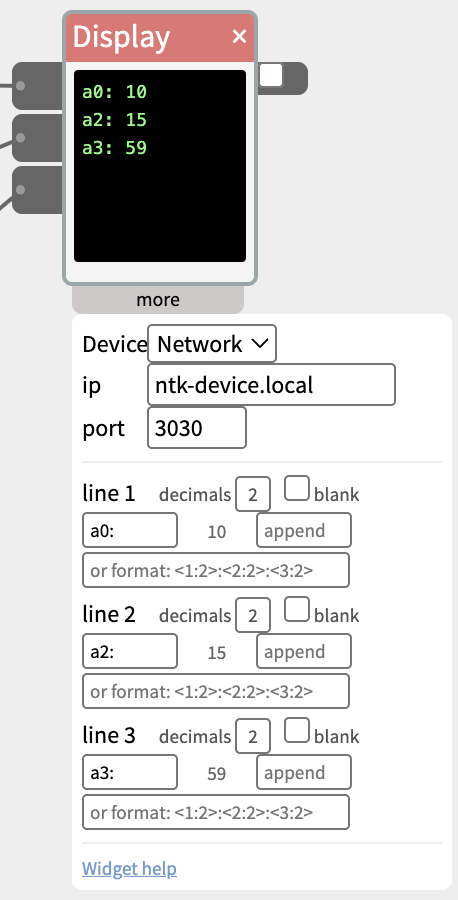
The Display widget takes whatever is wired into its three inlets (a sensor reading, a count, a piece of text) and writes it to an OLED display on a WiFi-connected board. Each line can have a label in front of the value and a unit after it, so a bare 23.50becomes Temp: 23.50 C. Use it to read out sensor values, show a clock, or give a standalone project a status screen.
Display needs a board running NTK’s CircuitPython Firmata firmware, which is included with your NTK download (the CircuitPython/ folder, with its own setup README), connected over Network (WiFi). The screen is a 128×64 SSD1306 OLED on the board’s I2C connection, such as the one built into the Seeed XIAO expansion board, or a separate OLED module on a Grove cable. A board running standard Arduino Firmata does not understand the Display widget.
How it works
- Wire something into an inlet. There are three, top to bottom: line 1, line 2, line 3. Each takes a number or text.
- The widget body is a preview. It shows the three lines exactly as they will be sent, so you can build and check the whole readout with no board connected.
- Tick the checkbox on the right edge to send the lines to the board. From then on the screen follows the widget as the values change.
- Numbers are shown with a fixed number of decimal places (2 by default), so a line doesn’t change width as its value changes. Text is shown as it arrives.
What’s on the screen
The OLED has six lines. The board uses the top three for its own status, and the Display widget fills the bottom three:
| Line | Shows |
|---|---|
| 1 | The board’s network name, e.g. ntk-device.local |
| 2 | Its IP address (prefixed AP when the board is running its own network) |
| 3 | WiFi signal strength and what the board is doing: connecting..., waiting..., controlled, standalone or monitored |
| 4 | Display widget line 1 |
| 5 | Display widget line 2 |
| 6 | Display widget line 3 |
A line holds roughly 21 characters. Anything longer runs off the right edge, so keep labels short.
The widget’s three lines stay blank until a patch with an active Display widget is running.
Formatting a line
Each line has its own settings in the “more” panel:
- prepend — text placed before the value, e.g.
Temp:. - append — text placed after the value, e.g.
C. Type the space yourself if you want one. - decimals — how many decimal places a number is shown with,
0to4. The default is2. Use0for values that are whole by nature, like a count or an hour. Text is not affected. - blank — show nothing on this line, whatever is wired into its inlet. See the next section for why that is useful.
Between the prepend and append fields the panel shows the line’s current value, already formatted.
The format field
Each line also has an optional format field. When it is filled in, it replaces that line’s prepend, value and append, and it can use any of the widget’s three inputs, not only its own:
<1>,<2>,<3>insert input 1, 2 or 3, formatted with that input’s own decimals setting.<1:2>does the same and pads a number with leading zeros to at least 2 digits, so5becomes05. The padding width is a single digit, 1 to 9. Text is never padded.- Everything else in the field is shown as typed.
This is how several values share one line. To show hours, minutes and seconds as a clock:
- Wire Hour, Minute and Second into the three inlets (a GroveIn widget set to Clock provides them).
- Set decimals to
0on all three lines. - Set line 1’s format to
<1:2>:<2:2>:<3:2>. - Tick blank on lines 2 and 3, so minutes and seconds don’t also appear on their own lines.
Line 1 then shows 14:05:09.
Settings (“more” panel)
- Device — set this to Network, with the board’s address and port (or use the left panel’s default Device, which is applied to new hardware widgets automatically). Changing the device, address or port unticks the checkbox; tick it again to reconnect.
- line 1 / line 2 / line 3 — the prepend, append, decimals, blank and format settings described above.
Standalone patches
Display works in a patch pushed to the board. The board fills in the three lines itself, with the same formatting, and the status line reads standalone.
Notes
- One display per board. The widget has no pin or address setting because there is only the one screen.
- The screen is optional. A board with no OLED attached simply ignores the Display widget; nothing else in the patch is affected.
- Nothing appears on the screen. Check that the checkbox is ticked and that the board’s own three status lines are showing. If those are blank too, the board isn’t finding the OLED.
- A number shows too many or too few digits. Change decimals for that line.
- A value appears twice. It is on its own line and also inside another line’s format. Tick blank on its own line.
- WiFi gets worse with the XIAO expansion board attached. An OLED board stacked directly on the XIAO sits close to its antenna and can shorten its range. If the connection drops, move the board closer to the access point, or use a XIAO with an external antenna.
Example patches
- GroveIn (Temp & Humidity) → Display — temperature on line 1 with prepend
Temp:and appendC, humidity on line 2 with append%. - GroveIn (Clock) → Display — a clock on one line, using the format field as described above.
- AnalogIn → Display — watch a sensor’s live value on the board itself while you tune a patch.
- Count → Display — a running total, with decimals set to
0.